Thursday, June 28, 2012

Summer of Blazing Imagination #2 - Shaving cream construction


Another day of searing heat in Texas, today we did Shaving Cream Construction for our Summer of Blazing Imagination...

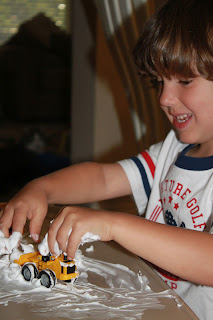
This activity is SO simple...take shaving cream, spray it on a table or other surface add cars, trucks or any vehicles you have & let the imagination begin. B is a ENORMOUS construction fan, so ours became a snowed in construction site. What better way to cool down on a hot day than to play in *snow*!


The trucks working together to pile the *snow* ...I loved how they even made tracks like they would have in real snow.

If you know B or any of our family really, we're not big on being messy. It actually took some coaxing to get him to be okay with his hands being dirty. So these pictures are GREAT, because he is truely having fun at being messy. I'll admit it, I even had to bit my tongue a couple of times when he started to get really crazy with the mess...it was starting to take Mommy out of her comfort zone; but look at the joy on his face...everything washes out, doesn't it?

 We even added in some learning by writing letters & drawing shapes.

This was truely worth the $1.00 for the shaving cream. B spent almost an hour at the construction site & probably would have stayed longer if we didn't have other things to do. He even cleaned it up himself ! After all that hard work in the snow his machines needed a good wash down in the sprayer (aka sink).

Oh and in case you're wondering how he handled being messy...B had shaving cream everywhere, the last picture doesn't show how much worse it got. It made it's way up his sleeves, covered his arms, his shirt, the floor and the bench he was sitting on. I think he handled it pretty well ;) 


Summer of Blazing Imagination #1 - car wash

Welcome to the first official post of
Summer of Blazing Imagination.... In Texas our Summer is hot sweltering and long, it seems to start around the end of April or early May and end around September or maybe even October. Although, I don't recall it being this way as a child; but as an adult (and now one with a child trapped inside a house for the better part of the day, due to heat advisories) it's a different story. Don't get me wrong, I *LOVE* the warm weather, it's the days of 105+ that I could truely live without.
So the "being trapped inside" got me to thinking that I needed to come up with something for us to do this Summer; especially since we're not dueing any unit studies. That's when it hit me, it's summer...let's do some fun, crazy, maybe out of our comfort zone kind of activities & share them with you, because I know I'm not the only one stuck inside with a kid trying to keep them busy.
Now onto our imagination activity...

Recycled Car Wash

What you need:
A box - whatever you have (we used a soda pack)
chennile sticks
crete papper
yarn
tape

I cut crete paper a little longer than the height of the box, then cut into sections about half way through and taped it to the roof of the car wash. Then the same with the yarn. For the chennile sticks, I used a pen & marker to get the twisted effect, then taped them on. You could paint your box or wrap it if you want to get fancy...but we had fun with ours just the way it was.

B loved this...he used it on his fleet of construction vehicles and then he built it into his train yard...all of his vehicles are clean as a whistle.
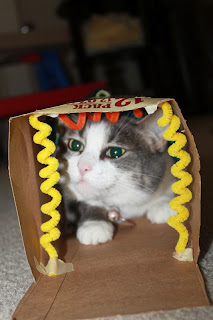
Even the kitty decided it looked like fun!

Saturday, June 23, 2012

Family Fun Night


If you're on Pintrest, I'm sure you've seen one of these...however I got my idea off a Chick-a-fil bag.
Unlike many, I have not join the ranks of Pintrest. I know, I know...it's fun and there are great ideas out there. Trust me I've wanted to join, but first I had problems signing in (when it was just starting out), then there's the 'I lost two plus hours of my life looking on Pintrest' comments that almost everyone seems to make. Frankly I don't have one hour much less two to get lost perussing misc. sites. So for now, I'm Pintrest free. I do however have a great Microsoft tool called OneNote (thanks to my DH), that is very similar where I can organize and link all the topics or sites I find I want to go back to. It's so great for homeschooling!

I digress, back to the real reason I'm posting...Our Family Fun Night bucket...
I had a leftover Gerber puffs tin that I just recovered with a design I created on some computer programs I have. Then I laminated it, taped it and added the pins. Voila...instant family fun!

 
Here's a few ideas, we came up with.
B was SO excited, he picked our first FFN to be Music Night, which was a blast. We pulled out ALL of B's instruments, the keyboard & DH guitar. WOW you should have heard the sounds coming from our house!! There was even some dancing and singing.
 
 
So what are you waiting for? Make your own FFN bucket & let the memories begin!

Father's Day Delima


Are you tired of buy the same things for Father's Day...ties, tools, or whatever they are into? Is Dad predicting what he's going to get before you've even bought it? Well we aren't quiet at that point, but I couldn't bring myself to buy another shirt or tie, so this year I got a little creative. DH has said that he wants to teach science (yeah!); he looks at the boxed science kits at the store and can't wait until B is old enough. Which got me to thinking, there are so many fun experiements that can be done with most of the things we have in the house. Plus what a great father/son experience. So an idea was born...
Meet our 3L Laboratory box...
Here are some of the goodies inside...
magnets
magnets
eye dropper
funnels
compass
rubber bands
twizzers
test tubes
petre dishes
batteries
baking soda
corn starch
tornado tube

 Of course I couldn't fit everything for all the experiments, but it's a good start.


I even included two science experiments books that we had.

I can't wait to see these two creating science memories together!

Wednesday, June 20, 2012

To Infinity and Beyond

Way back in April we learned about Outer Space, & I'm just now getting around to posting about it...yep life has been BUSY!
I love how simple or complex you can go with this unit, and how many times you can repeat it and always add something to make it new. We went really simple this time around & I wasn't sure B was connecting with any of it. I even had half a mind to ditch the whole thing with his disinterest and the list of my ever growing activities, chores and other crazy life things. However, I stuck it out, mostly because it was to fun of a unit to give up on...and I'm glad I did.
A month after this unit, while on a trip B kept talking about the Earth while we were in a restaurant. Honestly I had no clue what brought it up or why he was going on about it. It wasn't until he pointed at a picture across the room with an abstract Earth on it that his sudden re interest made any sense. He got it, he was listening and taking it in...sometimes you need those... Yes! moments. So don't give up Mommies, they REALLY are listening!

Now here are a few highlights from our Space unit...
 When I saw these cute little pie tins at the dollar store I knew they were meant for our space unit. They're so versatile, but we used them to count the stars.

2 Teaching Mommies has awesome downloads for FREE, here's one of the many ones we used planet letter matching.

Creating constellations with shapes and star stickers.

 A few of our fun space puzzles...B is really into puzzles 


 There were so many cute and creative art projects for this unit, but I had to pick just three due to our lack of time. The first one was a must, once I saw how easy it was...
 These little jars are all over the web, called time-out jars or glitter jars but I love how ChasingCheerios blog labeled them ...Starry Night Jars. They look just like a night filled with sparkling stars.
To make the jar, we filled it with warm water, added blue glitter and blue glitter glue. The glue creates a swirling effect when you shake the jar (we found that shaking didn't work, more of a gentle swirling or twisting), and we added a little extra clear school glue. No measuring, just guessed.
Don't be alarmed if you try it and it first just lumps together in the bottom of your jar, it takes a few swirls to get the right consistency.
*We used a mini plastic water bottle & glued the lid on.

How cute is this rocket? Not to mention a unusual keepsake. We simply painted B's foot (he chose the colors), then added some triangles for the top and wings for the rocket. He colored the fire blasting off below and added a few star stickers.

Coffee filter Earth...there are so many projects you can create with coffee filters, I found this one on 2 Teaching Mommies. Here's what you need... coffee filter, blue & green washable markers, spray bottle with water, black permanent marker & paper towels.

First find an print of the Earth, outline it with permanent marker & then color in the ocean and land. (you don't have to color it all in) Lay the Earth on several paper towels & spritz the Earth. The colors will soon fade, creating a swirling effect.

B wanted to make other planets too.

Here's our Earth...if you hang it on a window, it has a stain glass effect to it.

Okay, so what do you get when you combine some of the most random items together into a game...comet catch. This all started because B wanted to catch stars. Well we didn't have stars we could throw or launch, but that's when the idea of comets came along. To make the comets I took some of our $1 Target spot foam cylinders, added a dot sticker with a number and then made a launcher out of two pieces of Tinkertoy & a toy hammer (ghetto I know, but he had a blast with it!).

 Once we got it all set up, we put a 'comet' on the launcher and blasted it into space. On the other side of the room we had a large tote were we tried to make the comet hit. We also tried holding the tote to catch it & an even smaller insect net (that didn't work). To add in a bit more learning, before he could launch one he had to tell me the number on the comet. I think we spend 15 or 20 minutes catching comets. Sometimes, it doesn't take a lot of planning to make something educational or fun.

A few of our books on Space.


On the Farm

So a long, long, long time ago we spent a few weeks learning about farms.  Here's what we did...
Mother & child animal match up

Our farm nomenclature cards.

Playing with our felt board farm.

Farm patterning, clip cards & upper & lower case matching from 2teachingmommies.


I found this cute idea from another blog (sorry I don't remember which one).

 
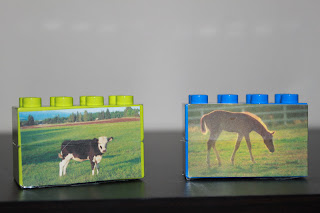
As you can see B had so much fun with the lego puzzle, especially making mixed up animals.

A simple color and number match activity.

D is for Ducks, we did a few farm do-a-dot pages from making learning fun.

We added farm puzzles to our shelves.

 
A small selection of farm books

To expand on our lesson we went to visit a real farm & even got to bring our Grandma along.


B actually took this photo of the farm ;)
Picking strawberries - Yum!
Feeding the horses

and checking out the goats.